

Foreword
Welcome to the beginning of your journey into OS Development! OS Dev is an extremely difficult, frustrating, and puzzling task. There is little in the way of instant gratification, and nothing is just handed to you. Likewise, if you can make your way through the labyrinth that is OS Dev, you will find the rewards are well worth the effort!
In OS Development, you start with nothing at your disposal. Want to use printf() to write to screen? You'll have to write your own printf function. Need to debug a function? Good luck, there are no debuggers here - unless you write your own kernel debugger. For me, what drew me to OS Dev is the challenge of it. I've run into several walls along the way, problems i thought i couldn't solve. When that happens - read, research, and retry! - but don't give up.
Following OS Dev will ultimately give you an understanding of the inner workings of other operating systems and the underlying hardware that they interact with. You will understand virtual memory, memory paging, how swapping from ram to disk works, the differences between ring3 and ring0, how and why system crashes happen (BSOD, anybody?), what your processor's protected mode is and how it works, keyboard drivers, graphics drivers, IRQ lines, and the list goes on and on...
Excited? Scared? Good, then let's get started.
Introduction
Like i said in the Foreword, in OS Dev, you don't get much to work with. There is no standard library of functions to use. The only functions and libraries you have are the ones you write. That being said, you do have some resources at your disposal.
Most of this guide uses information i learned from the OSDev Wiki - http://wiki.osdev.org/Main_Page" onclick="window.open(this.href);return false;. If you run into a problem in your code, the best thing to do is to read as much as you can about what you're trying to do. Knowledge is your greatest asset in OS Dev, and this is where you can find it. Additionally, they have a community forum where you can ask questions, but do your research before asking!
Additionally, there *IS* a debugger available for debugging your OS, but it is very basic and limited in its abilities. http://bochs.sourceforge.net/" onclick="window.open(this.href);return false;
We will be writing our OS in C in this guide, and we will require a few tools to get started:
VirtualBox - for running and testing your OS
Bochs (optional, but recommended) - Can also run and test your OS, used for debugging
Debian Linux - We will be developing our OS in debian, install it in a VM
A GCC Cross-compiler - We will use this compiler for compiling our kernel.
NASM - For compiling assembly source files
A Code Editor - A Code editor of your choice. Look around in synaptic for one.
Setting Up The Environment
Virtualbox
The first thing you need to install is virtualbox. I shouldn't have to walk you through this.
https://www.virtualbox.org/wiki/Downloads" onclick="window.open(this.href);return false;
Debian Linux
Next, we'll set up debian for development. Even if you are running a version of linux on your computer, i still recommend doing your development inside a debian virtual machine. We'll be building a cross-compiler for our OS, which may interfere with the regular compiler on your system and prevent you from building any packages.
I recommend downloading the debian net install disc image:
(32 bit) http://cdimage.debian.org/debian-cd/7.5 ... etinst.iso" onclick="window.open(this.href);return false;
(64 bit) http://cdimage.debian.org/debian-cd/7.5 ... etinst.iso" onclick="window.open(this.href);return false;
I shouldn't need to walk you through installing debian, so i won't.
When it's all set up, in your virtual machine settings for debian, expose a folder from your HOST OS to debian - this is where we'll be saving our OS's .iso file for testing in virtualbox/bochs.
Install the following tools in Debian unless stated otherwise.
Install a Code Editor
Before we build our cross-compiler, we need to download and install all of our other tools. If you have a preference for a code editor, you're welcome to use it. Make sure it can highlight assembly code as well as C code.
Personally, i use Geany, so if you want to try it out:
Run this as root: apt-get install geany
Install NASM
Install NASM by doing the following as root:
apt-get install nasm
Pretty straight forward, moving on...
Install Bochs
If you want to, install bochs. You're going to install this in your HOST OS, not your Debian machine!
On linux, just do: apt-get install bochs
Windows: http://bochs.sourceforge.net/" onclick="window.open(this.href);return false;
I'm not sure about linux, but on windows there are 2 binaries for bochs after you install it. One is for regular usage, and the other has debugging support enabled. Guess which one we're interested in?
Build your Cross-Compiler
Now for the fun part. In your debian virtual machine, you're going to compile your own version of gcc for your OS.
Since this is not a guide on building gcc cross-compilers and it's already been very well documented, i'm going to point you to the guide for doing this. Once you've got your compiler set up, continue to the next section.
http://wiki.osdev.org/GCC_Cross-Compiler" onclick="window.open(this.href);return false;
You'll want to build a cross-compiler for i686-elf.
Starting to Code Your Kernel
At this point, you'll want to make a directory for your project files if you haven't already. Typically i create an "osdev" folder in my home directory, and create "src", and "iso" folders inside of that.
Aside from your source files, you'll need a linker script and you'll probably want a compile script, unless you want to type in the long chain of commands every time.
You can use my linker and compile scripts:
Save this file as 'linker.ld' in your src directory:
Code: Select all
/* The bootloader will look at this image and start execution at the symbol
   designated as the entry point. */
ENTRY(_start)

/* Tell where the various sections of the object files will be put in the final
   kernel image. */
SECTIONS
{
	/* Begin putting sections at 1 MiB, a conventional place for kernels to be
	   loaded at by the bootloader. */
	. = 1M;

	._text BLOCK(4K) : ALIGN(4K)
	{
		*(.multiboot)
		*(._text)
	}

	/*. += 0xC0000000;*/
	/* First put the multiboot header, as it is required to be put very early
	   early in the image or the bootloader won't recognize the file format.
	   Next we'll put the .text section. */
	.text ALIGN(4K) : AT(ADDR(.text)/* - 0xC0000000*/)
	{
		*(.text)
	}

	/* Read-only data. */
	.rodata ALIGN(4K) : AT(ADDR(.rodata)/* - 0xC0000000*/)
	{
		*(.rodata)
	}

	/* Read-write data (initialized) */
	.data ALIGN(4K) : AT(ADDR(.data)/* - 0xC0000000*/)
	{
		*(.data)
	}

	/* Read-write data (uninitialized) and stack */
	.bss ALIGN(4K) : AT(ADDR(.bss)/* - 0xC0000000*/)
	{
		*(COMMON)
		*(.bss)
		*(.bootstrap_stack)
	}

	_KERNEL_END_ADDR = .;

	/* The compiler may produce other sections, by default it will put them in
	   a segment with the same name. Simply add stuff here as needed. */
}
Code: Select all
nasm kboot.asm -f elf -o kboot.o

../cross/bin/i586-elf-gcc -T linker.ld -o kernel.bin -ffreestanding -O2 -nostdlib kboot.o -lgcc
Next, create a new file in your src directory, called 'kboot.asm'
Paste the following code into it:
Code: Select all
; Declare constants used for creating a multiboot header.
MBALIGN     equ  1<<0                   ; align loaded modules on page boundaries
MEMINFO     equ  1<<1                   ; provide memory map
FLAGS       equ  MBALIGN | MEMINFO      ; this is the Multiboot 'flag' field
MAGIC       equ  0x1BADB002             ; 'magic number' lets bootloader find the header
CHECKSUM    equ -(MAGIC + FLAGS)        ; checksum of above, to prove we are multiboot

; Declare a header as in the Multiboot Standard. We put this into a special
; section so we can force the header to be in the start of the final program.
; You don't need to understand all these details as it is just magic values that
; is documented in the multiboot standard. The bootloader will search for this
; magic sequence and recognize us as a multiboot kernel.
section .multiboot
align 4
	dd MAGIC
	dd FLAGS
	dd CHECKSUM

; Currently the stack pointer register (esp) points at anything and using it may
; cause massive harm. Instead, we'll provide our own stack. We will allocate
; room for a small temporary stack by creating a symbol at the bottom of it,
; then allocating 16384 bytes for it, and finally creating a symbol at the top.
section .bootstrap_stack
align 4
stack_bottom:
times 16384 db 0
stack_top:

; The linker script specifies _start as the entry point to the kernel and the
; bootloader will jump to this position once the kernel has been loaded. It
; doesn't make sense to return from this function as the bootloader is gone.
section ._text
global _start
_start:
	; Welcome to kernel mode!

	cli

.hang:
	hlt
	jmp .hang
Check for errors (there shouldn't be any), and check for a 'kernel.bin' in your src directory.
Congratulations! You have now compiled your first kernel! This is called a bare-bones kernel - all it does is disable interrupts and halt the processor.
Let's try running our kernel. First, we'll need to put it into an iso disc image. This isn't too difficult to do. There's already a guide for doing this, so i'm going to point you to that guide. Once you get it all set up, we'll add some lines to your 'compile.sh' to automatically create the iso after the kernel is compiled.
http://wiki.osdev.org/Bootable_El-Torit ... RUB_Legacy" onclick="window.open(this.href);return false;
Not too difficult, right?
Now open your 'compile.sh' for editing and add the following lines to the bottom:
Code: Select all
cp ./kernel.bin ../iso/boot/
cd ../
genisoimage -R -b boot/grub/stage2_eltorito -no-emul-boot -boot-load-size 4 -boot-info-table -o bootable.iso iso
rm ./windows/bootable.iso
cp ./bootable.iso ./windows/
Remember during the Debian setup step above, i told you expose a folder from your host OS to debian? In my script, './windows/' is referring to that folder. From there, i could go into virtualbox in windows and run the iso for testing.
Go ahead and save your compile script and run it again. If everything worked out okay, you should get output like this:
Code: Select all
I: -input-charset not specified, using utf-8 (detected in locale settings)
Size of boot image is 4 sectors -> No emulation
Total translation table size: 2048
Total rockridge attributes bytes: 922
Total directory bytes: 4096
Path table size(bytes): 34
Max brk space used 22000
251 extents written (0 MB)
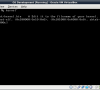
Awesome! It worked! It doesn't do anything yet, but we'll change that soon. First, let's talk about what's happening here.
You may have noticed that we've taken a few shortcuts on some things. For example, we did not write our own bootloader. My reason for this is that a bootloader is fairly complicated to write, it's all done in assembly, it's ridiculously difficult to debug when there's a problem, and most bootloaders do the same thing. Most people want to jump right into the OS Dev part, so we're using grub to load our kernel for us.
Aside from loading our kernel, grub does us a few favors as well. When the computer first turns on, the processor is in what's called "Real Mode". This is a 16-bit mode that the processor runs in while running your bootloader. The only real advantage to being in this mode is that you have access to BIOS interrupts, which act as functions. Using BIOS interrupts, you can do things like change the screen resolution, read and write to floppy drives and hard drives, write to the screen, etc.
Shortly before GRUB hands control over to your kernel, it enables 32-bit Protected mode. It also scans your RAM and maps used and free memory ranges for you, which is passed in the EBX register when it calls your kernel's entry point.
So, when GRUB finally calls your kernel's entry point, this is where you stand:
- You are in 32-bit Protected mode and have full access to the 4GB range of memory.
- Virtual Memory (paging) is disabled. You have direct access to physical memory.
- You have a pointer in EBX that points to a memory map array, which is provided by GRUB
- You are running in Ring-0
- Any errors in your code that would throw an interrupt will cause the cpu to triple-fault, causing a reboot loop.
So what now? Well, the first thing you really want to do is be able to draw to screen. This is useful for debugging future code, but it's also nice to make your kernel do something that you can see.
First things first, though... we must install a GDT.
The Global Descriptor Table - GDT
The GDT is used by the processor to determine permissions and access rights to certain areas of physical memory. This is where you can set memory ranges to be used in ring-0 only, or ring-3. It's also used to set which sections of memory are used for executing code and which sections are used for data. Code and data sections can overlap in the GDT.
For our kernel, we're simply going to map the entire 4GB memory range to both code and data, all for ring-0 only. We can easily change this later.
Each entry in the GDT is an 8-byte value. The first entry of the GDT is not used, so most people just put a null entry for the first entry of the GDT.
The 8 bytes of a GDT entry Specify the following:
-Base address
-Limit
-Flags: Granularity, Size
-Access byte: Present bit, Privilege bits, Executable bit, Direction/conforming bit, Readable/Writable bit, Accessed bit
Base address is used to specify the beginning address the GDT entry pertains to.
Limit is added or subtracted from base (depending on your direction bit) to create the memory range affected by this GDT entry.
Granularity specifies whether limit is a count of bytes or a count of pages (a page is 4kb or 4096 bytes).
What we want are 2 GDT entries, covering the entire 4gb memory space, specifying both code and data. This will make all memory readable, writeable, and executable. This can be changed later, so don't fret over it.
To do this, we need to create a entry with a base of 0, a limit of 0xFFFFF, and a granularity of 1, to represent page granularity. A limit of 0xFFFFF multiplied by a 4kb granularity gives us the full 4gb memory range.
Add the following code to your 'kboot.asm' after the `cli` command and before the `.hang` label:
Code: Select all
gdt_install:
		lgdt [m_gdt]
		mov ax, 0x10 ; Load 0x10 into AX - 0x10 represents the data segment in the GDT
		mov ds, ax ; Fill in the segment registers with AX
		mov es, ax
		mov fs, ax
		mov gs, ax
		mov ss, ax
		jmp 0x08:gdt_return ; jumping like this puts 0x08 into CS -  the Code Segment


	gdt_start:

		; null descriptor

		dd 0
		dd 0

		;code descriptor

		dw 0xFFFF ; limit low
		dw 0x0000 ; base low
		db 0x00	  ; base middle
		db 0x9A	  ; access
		db 0xCF	  ; granularity ; 4 bits of this is flags, the other 4 are for the limit.
		db 0x00   ; base high

		;data descriptor

		dw 0xFFFF ; limit low
		dw 0x0000 ; base low
		db 0x00	  ; base middle
		db 0x92	  ; access
		db 0xCF	  ; granularity
		db 0x00   ; base high

	gdt_end:

	m_gdt:
		dw gdt_end - gdt_start - 1;
		dd gdt_start

	gdt_return:
If you compile now, you won't see any visual change. However, now that we know we can execute code and write data anywhere, we can now write a function for drawing to screen.
At this point, we should go ahead and write a 'kernel_main' function. So, let's write some C code finally!
Writing a kernel main function in C
Go ahead and create a new file, 'kernel.c'. Paste the following code into the new file:
Code: Select all
#if !defined(__cplusplus)
#include <stdbool.h> /* C doesn't have booleans by default. */
#endif
#include <stddef.h>
#include <stdint.h>
/* Check if the compiler thinks if we are targeting the wrong operating system. */
#if defined(__linux__)
#error "You are not using a cross-compiler, you will most certainly run into trouble"
#endif
#if defined(__cplusplus)
extern "C" /* Use C linkage for kernel_main. */
#endif
void k_main(void)
{
unsigned char *vidmem = (unsigned char*) 0xB8000;
unsigned char *tmp = vidmem;
for(int i = 0; i < 80 * 25; i++) // clear the screen - fill with black
{
*tmp = 0;
tmp++;
*tmp = 0x07;
tmp++;
}
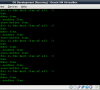
char hello[] = "Hello, world!";
tmp = vidmem;
for(int i = 0; hello[i] != 0; i++)
{
*tmp = (unsigned char) hello[i];
tmp++;
*tmp = 0x07;
tmp++;
}
// technically, we should not return from this function. In this case, it's okay since it'll just halt the processor.
}
In VGA Text Mode, (which is what we're in) video memory resides at address 0xB8000. For each character that is displayed on screen, 2 bytes are used. The first byte is the ascii code of the character, and the 2nd byte is the color code. The 4 low bits are used for the foreground color (the color of the ascii character), and 3 high bits (bits 4-6) are used for the background color. In this Text Mode, you have an 80 character wide screen and 25 rows.
In the code above, the first loop clears the screen to black. The second loop takes the string and writes it to video memory.
Before you can compile and run this code, you need to do a few more things.
Add the following code to your kboot.asm file, after 'gdt_return'
Code: Select all
	extern k_main
	call k_main
One more thing to do: Add 'kernel.c' to our compile script. Put the following in 'compile.sh':
Code: Select all
../cross/bin/i586-elf-gcc -c kernel.c -o kernel.o -std=gnu99 -ffreestanding -O2 -Wall -Wextra -O0
Code: Select all
../cross/bin/i586-elf-gcc -T linker.ld -o kernel.bin -ffreestanding -O2 -nostdlib kboot.o kernel.o -lgcc
Go ahead and compile and run.
Hey, now we're getting somewhere! Now let's write some basic functions for setting text color, background color, and writing to the screen.
Create a new folder in your 'src' directory and call it 'display'. Inside the new folder, create 2 new files: 'console.h' and 'console.c'.
Update your 'compile.sh' script:
Code: Select all
../cross/bin/i586-elf-gcc -c ./display/console.c -o console.o -std=gnu99 -ffreestanding -O2 -Wall -Wextra -O0
Now open up your 'console.h' and paste the following:
Code: Select all
#ifndef CONSOLE_H
#define CONSOLE_H

#if !defined(__cplusplus)
#include <stdbool.h> /* C doesn't have booleans by default. */
#endif
#include <stddef.h>
#include <stdint.h>

#define VID_MEM_ADDR	0xB8000

#define CLR_BLACK			0
#define CLR_BLUE			1
#define CLR_GREEN			2
#define CLR_CYAN			3
#define CLR_RED				4
#define CLR_MAGENTA			5
#define CLR_BROWN			6
#define CLR_LIGHTGRAY		7
#define CLR_DARKGRAY		8
#define CLR_LIGHTBLUE		9
#define CLR_LIGHTGREEN		0x0A
#define CLR_LIGHTCYAN		0x0B
#define CLR_LIGHTRED		0x0C
#define CLR_LIGHTMAGENTA	0x0D
#define CLR_YELLOW			0x0E
#define CLR_WHITE			0x0F

/* *
 *
 * 		These two functions set the color code value for foreground and background color.
 * 		The color code is 1 byte (8 bits). The low 4 bits (bits 0-3) represent the foreground color,
 * 		and bits 4-6 are for the background color. Bit 7 is not used for the color code and should
 * 		be set to 0. Due to the 3 bit limit of the background color, the background color can only
 * 		be colors 0-7.
 *
 * */

bool setBgColor(unsigned char); // sets the background color
bool setFgColor(unsigned char); // sets the foreground color

/* *
 *
 * 		The writeLine() function writes a string to the next available line. Moves down to the next line when
 * 		encountering '\n' characters. writeLine() also adds an extra '\n' to the end of the provided string.
 * 		writeLine() will also call scrollTerm() if it reaches the 25th line.
 *
 * */

void writeLine(char *str);

/* *
 *
 * 		putString() writes a string to the specified line. Ignores all newline characters and does not modify
 * 		the current line position. Will not scroll the screen. Any strings longer than 80 characters are truncated to 80 characters.
 *
 * */

void putString(char *str, short line);

/* *
 *
 * 		clearScreen() Simply clears the screen with the background color set by the setBgColor() function.
 * 		Resets line position to the top of the screen.
 *
 * */

void clearScreen(void);

/* *
 *
 * 		scrollTerm() scrolls the screen by 'n' lines. Fills in the bottom 'n' lines with blank space.
 *
 * */

void scrollTerm(unsigned char n);

#endif
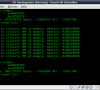
Now let's test our code and trying writing to the screen, setting colors, and scrolling:
Put this in your 'k_main' function:
Code: Select all
	setBgColor(CLR_BLACK);
	setFgColor(CLR_GREEN);

	clearScreen();

	char *strings[5] = {0};

	char str1[] = "This is a line.";
	char str2[] = "This is another line.";
	char str3[] = "This is yet another line.";
	char str4[] = "This is an even better line.";
	char str5[] = "But this, this is the best line of all. :)";

	strings[0] = str1;
	strings[1] = str2;
	strings[2] = str3;
	strings[3] = str4;
	strings[4] = str5;

	for(int i = 0; i < 1000; i++)
	{
		writeLine(strings[i % 5]);

		for(unsigned long x = 0; x < 0x2FFFFFF; x++); // this is just to slow the scrolling down since we don't have a sleep function yet.
	}
Did yours work? If not, try debugging your code. Learning how to do so in this development environment will be very helpful when writing more complex code later on.
The next thing we should do is set up our interrupt descriptor table.
The Interrupt Descriptor Table - IDT
The interrupt descriptor table is very similar in setup and structure to the GDT we set up before. It's function, however, is completely different.
The x86 (and amd64) architecture is an interrupt driven system. This allows the processor to run other pieces of code while waiting for some other operation to complete, like a disk read. Without this, the processor would be wasting valuable clock cycles constantly polling hardware devices for their status.
Interrupts occur when the processor's current state of execution is interrupted and redirected to another piece of code - usually an interrupt handler.
For example, a common interrupt is int3. The in3 interrupt is used by debuggers to set a breakpoint in a piece of code. When the int3 interrupt is raised, the processor saves some state information to the stack and starts executing the specified interrupt handler. This is called a software interrupt.
A hardware interrupt acts very similarly to a software interrupt. A common hardware interrupt is the one generated by the keyboard every time a key is pressed. In this case, the keyboard notifies a chip called the Programmable Interrupt Controller, or PIC.
The PIC has 16 IRQ lines, or Interrupt Request lines. Some of these lines are hardwired to a specific piece of hardware. For example, IRQ0 is for the system timer interrupt (the Programmable Interval Timer chip) and IRQ1 is for the keyboard. When any of these IRQ lines are raised, the PIC checks its mask register to see if the CPU wants interrupts from this IRQ. If the IRQ is enabled, the PIC then sets the interrupt line going to the processor to high. Depending on if interrupts are enabled in the processor's flags register, the processor will either ignore the interrupt or execute the interrupt handler for that interrupt.
There are times when we want the processor to ignore all interrupts. For example, while we're setting up our new IDT, we don't want the processor to be interrupted. That could lead to a triple fault! There are two assembly instructions for this: cli, and sti. The 'cli' instruction clears the interrupt flag in the processor's flags register, while 'sti' sets the flag. After the processor executes each instruction, it checks the interrupt line, and if the interrupt flag is set, it handles the interrupt.
We have to be careful about how we set up our IDT. One mistake can cause a problem that will be very difficult to track down. Aside from setting up our IDT, we'll need to program the PIC as well. Let's do it.
Create a new folder called "interrupt" in your src directory. Inside that folder create 3 files: "idt.h", "idt.c", and "idt.asm". Yes, we'll have to write some assembly code.
Paste the following code in your "idt.h" file:
Code: Select all
#ifndef IDT_H
#define IDT_H

#if !defined(__cplusplus)
#include <stdbool.h> /* C doesn't have booleans by default. */
#endif
#include <stddef.h>
#include <stdint.h>

struct IDT_Entry {

	unsigned short offsetlow;
	unsigned short codeSelector;
	unsigned char zero;
	unsigned char type_attr;
	unsigned short offsethigh;

} __attribute__((packed)); // we want this packed down to exactly 8 bytes.

struct IDT_Desc {

	unsigned short size;
	unsigned long addr;

} __attribute__((packed)); // we want this packed down to exactly 6 bytes

struct IDT_Desc idt_desc;
struct IDT_Entry idt_entries[256];

void idt_init(void);

// these external functions are handled in idt.asm
extern void load_idt(void);
extern void init_pic(void);

extern void isr_divide_by_zero(void);
extern void isr_debugger(void);
extern void isr_nmi(void);
extern void isr_breakpoint(void);
extern void isr_overflow(void);
extern void isr_bounds(void);
extern void isr_invalid_opcode(void);
extern void isr_coprocessor_not_avail(void);
extern void isr_double_fault(unsigned long);
extern void isr_coprocessor_segment_overrun(void);
extern void isr_invalid_tss(unsigned long);
extern void isr_segment_not_present(unsigned long);
extern void isr_stack_fault(unsigned long);
extern void isr_general_protection_fault(unsigned long);
extern void isr_page_fault(unsigned long);
extern void isr_reserved(void);
extern void isr_math_fault(void);
extern void isr_alignment_check(void);
extern void isr_machine_check(void);
extern void isr_simd_floating_point_exception(void);

void int_divide_by_zero(void);
void int_debugger(void);
void int_nmi(void);
void int_breakpoint(void);
void int_overflow(void);
void int_bounds(void);
void int_invalid_opcode(void);
void int_coprocessor_not_avail(void);
void int_double_fault(unsigned long);
void int_coprocessor_segment_overrun(void);
void int_invalid_tss(unsigned long);
void int_segment_not_present(unsigned long);
void int_stack_fault(unsigned long);
void int_general_protection_fault(unsigned long);
void int_page_fault(unsigned long);
void int_reserved(void);
void int_math_fault(void);
void int_alignment_check(void);
void int_machine_check(void);
void int_simd_floating_point_exception(void);

#endif
Paste the following code into your "idt.c":
Code: Select all
#include "idt.h"
#include "../display/console.h"

void idt_init(void)
{

	// We'll need to tell the processor where the IDT is in memory, and how big it is in bytes.
	// If we set the data in the following structure, then we can just point the processor to
	// our structure.

	idt_desc.addr = (unsigned long) idt_entries;
	idt_desc.size = (unsigned short) sizeof(struct IDT_Entry) * 256;


	// This is an array of interrupt service routine addresses.
	// The first 32 interrupts are reserved by intel for processor exceptions.
	// Intel doesn't use all the reserved interrupts, but we need to keep them
	// free in case that changes in the future.

	unsigned long isr_addresses[20] = {0};

	isr_addresses[0] = (unsigned long) isr_divide_by_zero;
	isr_addresses[1] = (unsigned long) isr_debugger;
	isr_addresses[2] = (unsigned long) isr_nmi;
	isr_addresses[3] = (unsigned long) isr_breakpoint;
	isr_addresses[4] = (unsigned long) isr_overflow;
	isr_addresses[5] = (unsigned long) isr_bounds;
	isr_addresses[6] = (unsigned long) isr_invalid_opcode;
	isr_addresses[7] = (unsigned long) isr_coprocessor_not_avail;
	isr_addresses[8] = (unsigned long) isr_double_fault;
	isr_addresses[9] = (unsigned long) isr_coprocessor_segment_overrun;
	isr_addresses[10] = (unsigned long) isr_invalid_tss;
	isr_addresses[11] = (unsigned long) isr_segment_not_present;
	isr_addresses[12] = (unsigned long) isr_stack_fault;
	isr_addresses[13] = (unsigned long) isr_general_protection_fault;
	isr_addresses[14] = (unsigned long) isr_page_fault;
	isr_addresses[15] = (unsigned long) isr_reserved;
	isr_addresses[16] = (unsigned long) isr_math_fault;
	isr_addresses[17] = (unsigned long) isr_alignment_check;
	isr_addresses[18] = (unsigned long) isr_machine_check;
	isr_addresses[19] = (unsigned long) isr_simd_floating_point_exception;

	// Now we must loop through and fill in each IDT entry

	for(int i = 0; i < 256; i++)
	{
		if(i < 20) // fill in the function pointers set in the array above
		{
			idt_entries[i].offsetlow = (isr_addresses[i] & 0xFFFF);
			idt_entries[i].codeSelector = 0x08;
			idt_entries[i].offsethigh = ((isr_addresses[i] >> 16) & 0xFFFF);
			idt_entries[i].zero = 0;
			idt_entries[i].type_attr = ((1 << 7) | 0x0E); // sets present bit, 0x0E = interrupt gate

			continue;
		}

			// these remaining routines just use the empty 'reserved' irq routine, since they're unused right now
			idt_entries[i].offsetlow = (isr_addresses[15] & 0xFFFF);
			idt_entries[i].codeSelector = 0x08;
			idt_entries[i].offsethigh = ((isr_addresses[15] >> 16) & 0xFFFF);
			idt_entries[i].zero = 0;
			idt_entries[i].type_attr = ((1 << 7) | 0x0E); // sets present bit, 0x0E = interrupt gate
	}

	load_idt();
	init_pic();
	__asm("sti"); // enable interrupts
}

void int_divide_by_zero(void)
{

}

void int_debugger(void)
{

}
void int_nmi(void)
{

}
void int_breakpoint(void)
{
	setBgColor(CLR_BLACK);
	setFgColor(CLR_RED);

	writeLine("INT3 DEBUGGER BREAKPOINT INTERRUPT");

	setBgColor(CLR_BLACK);
	setFgColor(CLR_GREEN);
}
void int_overflow(void)
{

}

void int_bounds(void)
{

}
void int_invalid_opcode(void)
{

}
void int_coprocessor_not_avail(void)
{

}

void int_double_fault(unsigned long e __attribute__((unused)))
{

}
void int_coprocessor_segment_overrun(void)
{

}

void int_invalid_tss(unsigned long e __attribute__((unused)))
{

}

void int_segment_not_present(unsigned long e __attribute__((unused)))
{

}

void int_stack_fault(unsigned long e __attribute__((unused)))
{

}

void int_general_protection_fault(unsigned long e __attribute__((unused)))
{

}

void int_page_fault(unsigned long e __attribute__((unused)))
{

}

void int_reserved(void)
{

}

void int_math_fault(void)
{

}

void int_alignment_check(void)
{

}

void int_machine_check(void)
{

}

void int_simd_floating_point_exception(void)
{

}
Next, copy the following into "idt.asm":
Code: Select all
extern idt_desc

; load the IDT
global load_idt
load_idt:
	lidt [idt_desc]
	ret

; these functions are declared in idt.h and handled in idt.c
extern int_divide_by_zero
extern int_debugger
extern int_nmi
extern int_breakpoint
extern int_overflow
extern int_bounds
extern int_invalid_opcode
extern int_coprocessor_not_avail
extern int_double_fault
extern int_coprocessor_segment_overrun
extern int_invalid_tss
extern int_segment_not_present
extern int_stack_fault
extern int_general_protection_fault
extern int_page_fault
extern int_reserved
extern int_math_fault
extern int_alignment_check
extern int_machine_check
extern int_simd_floating_point_exception
extern int_system_timer

; these functions are 'trampoline' functions. The simply call their C-function counterpart.
global isr_divide_by_zero
global isr_debugger
global isr_nmi
global isr_breakpoint
global isr_overflow
global isr_bounds
global isr_invalid_opcode
global isr_coprocessor_not_avail
global isr_double_fault
global isr_coprocessor_segment_overrun
global isr_invalid_tss
global isr_segment_not_present
global isr_stack_fault
global isr_general_protection_fault
global isr_page_fault
global isr_reserved
global isr_math_fault
global isr_alignment_check
global isr_machine_check
global isr_simd_floating_point_exception
global isr_system_timer

isr_divide_by_zero:
	pushad
	call int_divide_by_zero
	popad
	iret

isr_debugger:
	pushad
	call int_debugger
	popad
	iret

isr_nmi:
	pushad
	call int_nmi
	popad
	iret

isr_breakpoint:
	pushad
	call int_breakpoint
	popad
	iret

isr_overflow:
	pushad
	call int_overflow
	popad
	iret

isr_bounds:
	pushad
	call int_bounds
	popad
	iret

isr_invalid_opcode:
	pushad
	call int_invalid_opcode
	popad
	iret

isr_coprocessor_not_avail:
	pushad
	call int_coprocessor_not_avail
	popad
	iret

isr_double_fault:
	pushad
	call int_double_fault
	popad
	iret

isr_coprocessor_segment_overrun:
	pushad
	call int_coprocessor_segment_overrun
	popad
	iret

isr_invalid_tss:
	pushad
	call int_invalid_tss
	popad
	iret

isr_segment_not_present:
	pushad
	call int_segment_not_present
	popad
	iret

isr_stack_fault:
	pushad
	call int_stack_fault
	popad
	iret

isr_general_protection_fault:
	pushad
	call int_general_protection_fault
	popad
	iret

isr_page_fault:
	pushad
	call int_page_fault
	popad
	iret

isr_reserved:
	pushad
	call int_reserved
	popad
	iret

isr_math_fault:
	pushad
	call int_math_fault
	popad
	iret

isr_alignment_check:
	pushad
	call int_alignment_check
	popad
	iret

isr_machine_check:
	pushad
	call int_machine_check
	popad
	iret

isr_simd_floating_point_exception:
	pushad
	call int_simd_floating_point_exception
	popad
	iret
At the top of the assembly file, we see a strange instruction, "lidt". That basically means "Load IDT".
You can see that we're passing the IDT_Desc structure we filled in in our C file. Everything is coming together nicely so far, wouldn't you say?
The last thing we need to do is program the PIC. This is pretty easy.
Create a new file in your interrupt folder and call it 'pic.asm'.
Paste the following code into the new file:
Code: Select all
global init_pic
init_pic:

	mov al, 0x11 ; First initialization byte for the pic

	out 0x20, al ; send first init byte to pic1
	out 0xA0, al ; send first init byte to pic2

	; now let's map the pic to irq numbers 32 - 48

	mov al, 0x20
	out 0x21, al

	mov al, 0x28
	out 0xA1, al

	; now let's tell the pic chips what lines they're linked together on

	mov al, 0x04
	out 0x21, al

	mov al, 0x02
	out 0xA1, al

	; tell the pic that we're in 80x86 mode

	mov al, 1

	out 0x21, al
	out 0xA1, al

	; now let's just null the data registers and we're done

	xor al, al

	out 0x21, al
	out 0xA1, al

	ret
There is a lot of information available about the PIC, so i'm not going to cover it in any more detail here. For more information on the PIC and about interrupts, check out the following links:
http://wiki.osdev.org/Interrupts" onclick="window.open(this.href);return false;
http://wiki.osdev.org/Interrupt_Service_Routines" onclick="window.open(this.href);return false;
http://wiki.osdev.org/IDT" onclick="window.open(this.href);return false;
http://wiki.osdev.org/PIC" onclick="window.open(this.href);return false;
http://www.brokenthorn.com/Resources/OSDevPic.html" onclick="window.open(this.href);return false;
Want to test your interrupt handlers? Try putting an int3 breakpoint in your k_main:
Code: Select all
__asm("int3");
The Physical Memory Manager
Physical memory refers to the physical RAM in your computer. If i put some data at address 0x1000 in ram, then that's exactly where it is. There is no translation to a different address, like with virtual memory.
Virtual memory, on the other hand is the opposite. Address 0x1000 in virtual memory could point to any location in physical memory. It can also be a different location in physical memory each time.
The concept behind physical memory management is pretty simple. Basically, you keep track of which *pages* of physical memory are allocated and which pages are free. You have to do this without eating up half of the ram in the process though. that means no large data structures to represent a single page of physical memory. There are a few different ways to do this, each with it's own pros and cons, but today i'm going to show you one of the simpler ways of doing it: a bit-map.
A bit-map basically uses a single bit to represent the status of a page of memory. If the bit is set, then the memory is in use and cannot be allocated for something else. If the bit is clear, then the memory is free to use.
In this case, we can use an array of DWORD values for our bitmap. Since we're developing a 32-bit OS and the max amount of ram (without PAE) for a 32-bit OS is 4gb, we need enough bits to represent 4gb of ram. You can do the math yourself, but that comes out to 1,048,576 bits, or 32,768 DWORDs. That's only 128kb!
We'll need to write a few functions:
-A function to initialize the physical memory manager: pmm_init()
-A function to allocate x pages of physical memory: pmm_allocate()
-A function to free a single page of physical memory: pmm_free()
-Optionally, a function that prints the free memory ranges and the number of free bytes, kilobytes, and megabytes (a nice function for testing and troubleshooting)
Did you notice something strange? We have a function to allocate multiple pages at once, but our pmm_free function only frees a single page. The reason for this is because of how virtual memory works, but we'll cover that in the next section.
Speaking of virtual memory... why use it? It seems like we're getting along just fine with physical memory. In fact, we could skip using virtual memory completely if we wanted to. Older computer systems did exactly that. There are problems with it, though.
Virtual memory brings with it the ability to do access control on specific pages of memory (read, write, execute), it also allows each program to have its own address space. That means each program can be loaded at the same virtual address every time. Additionally, it allows us to use the hard drive as extra space by swapping pages out of memory.
The role of the physical memory manager is simply to hand out unallocated physical memory to the virtual memory manager and to de-allocate physical memory when the virtual memory manager is done with it. So aside from testing and debugging, we won't be directly allocating physical memory for anything in our kernel. In fact, once we enable virtual memory paging, we won't be able to even if we want to.
With that said, let's get to the code.
Inside your 'src' directory, create a new folder called 'memory'. Inside that folder, create 3 new files: 'pm_manager.h', 'pm_manager.c', and 'multiboot.h'.
Copy the code from here and put it in your multiboot.h file.
Paste the following into pm_manager.h:
Code: Select all
#ifndef PM_MANAGER_H
#define PM_MANAGER_H

#if !defined(__cplusplus)
#include <stdbool.h> /* C doesn't have booleans by default. */
#endif
#include <stddef.h>
#include <stdint.h>

#include "multiboot.h"

#define ADDR_TO_PAGE(x) (x / 0x1000) // takes a memory address and converts it to a 4kb page number

void pmm_init(multiboot_info_t* mbinfo);
void pmm_print_ranges(void);

void* pmm_allocate(unsigned long pages);
void pmm_free(unsigned long page);

#endif
http://code.suck-o.com/42560" onclick="window.open(this.href);return false;
Additionally, in order to compile the code i provided, you'll need a printf function. If you want, you can use mine:
Download File
Create a new directory in your 'src' folder and call it 'include'. Copy the files from the archive into the new folder.
Once you get everything set up and working, you can try playing with the physical memory manager:
That's it for this section. Before moving onto virtual memory management, make sure you have a strong grasp of the concept behind the physical memory manager and the code for it. We will be expanding upon this concept in the next section.
Further reading:
http://wiki.osdev.org/Detecting_Memory_ ... p_Via_GRUB" onclick="window.open(this.href);return false;
http://wiki.osdev.org/Page_Frame_Allocation" onclick="window.open(this.href);return false;
Guide continues on page 2 of this topic


